 README
README
![]()
Backrest is a fully open source web UI wrapper for restic. Backrest aims to take away the burden of setting up and managing restic backups by providing a simple web UI that supports both scheduling backup operations as well as browsing and restoring from existing backups. Backrest is shipped as a self-contained and light weight (<20 MB on all platforms) binary with no installation dependencies.
Platform Support
- Linux
- Docker
- MacOS (Darwin)
- (experimental) Windows
Features
- WebUI for restic supports local and remote access (e.g. run on a NAS and access from your desktop)
- Realtime UI e.g. live progress bars for backup operations and live refreshes of operation history.
- Snapshot browser
- Restore interface
- Highly configurable backups
- Detailed scheduling options
- Configurable retention policies with restic forget (e.g. keep 1 snapshot per day for 30 days, 1 snapshot per week for 6 months, etc)
- Include lists
- Exclusion lists
- Add custom CLI flags for detailed control of restic e.g. for use with rclone
- Supported destinations are any restic supported repository (e.g. local filesystem, S3, Backblaze, rclone, etc).
- Automatic repo health operations e.g. forget and prune.
- Forget runs after every backup.
- Prune once every 7 days by default.
- Multiple backup plans can be configured running on different schedules and with different retention policies.
- Multiple restic repositories can be configured and used in different plans.
Planned Features
- Authentication support e.g. to password protect the web UI.
- WebUI for rclone configuration, today this must be done by passing extra flags in the repository configuration.
- Notifications e.g. email, discord, slack, webhook, etc.
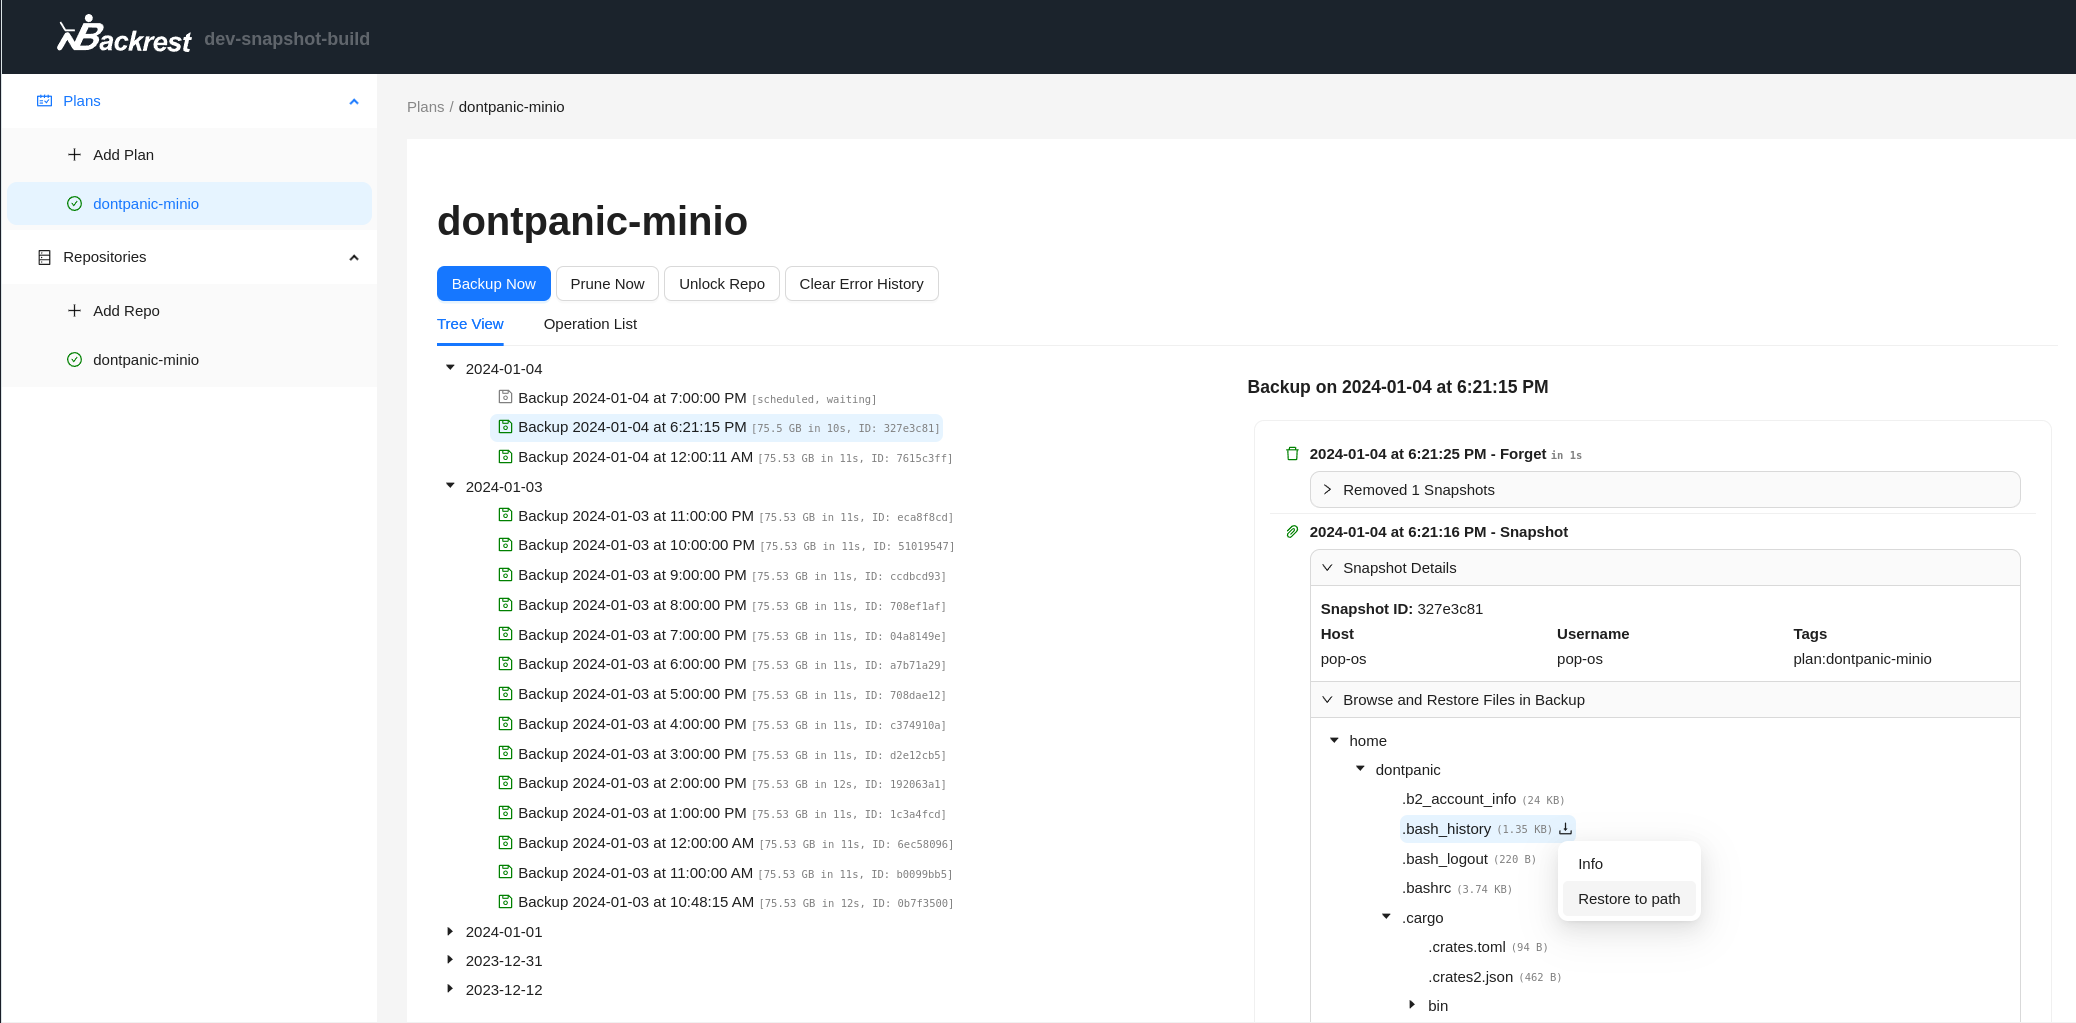
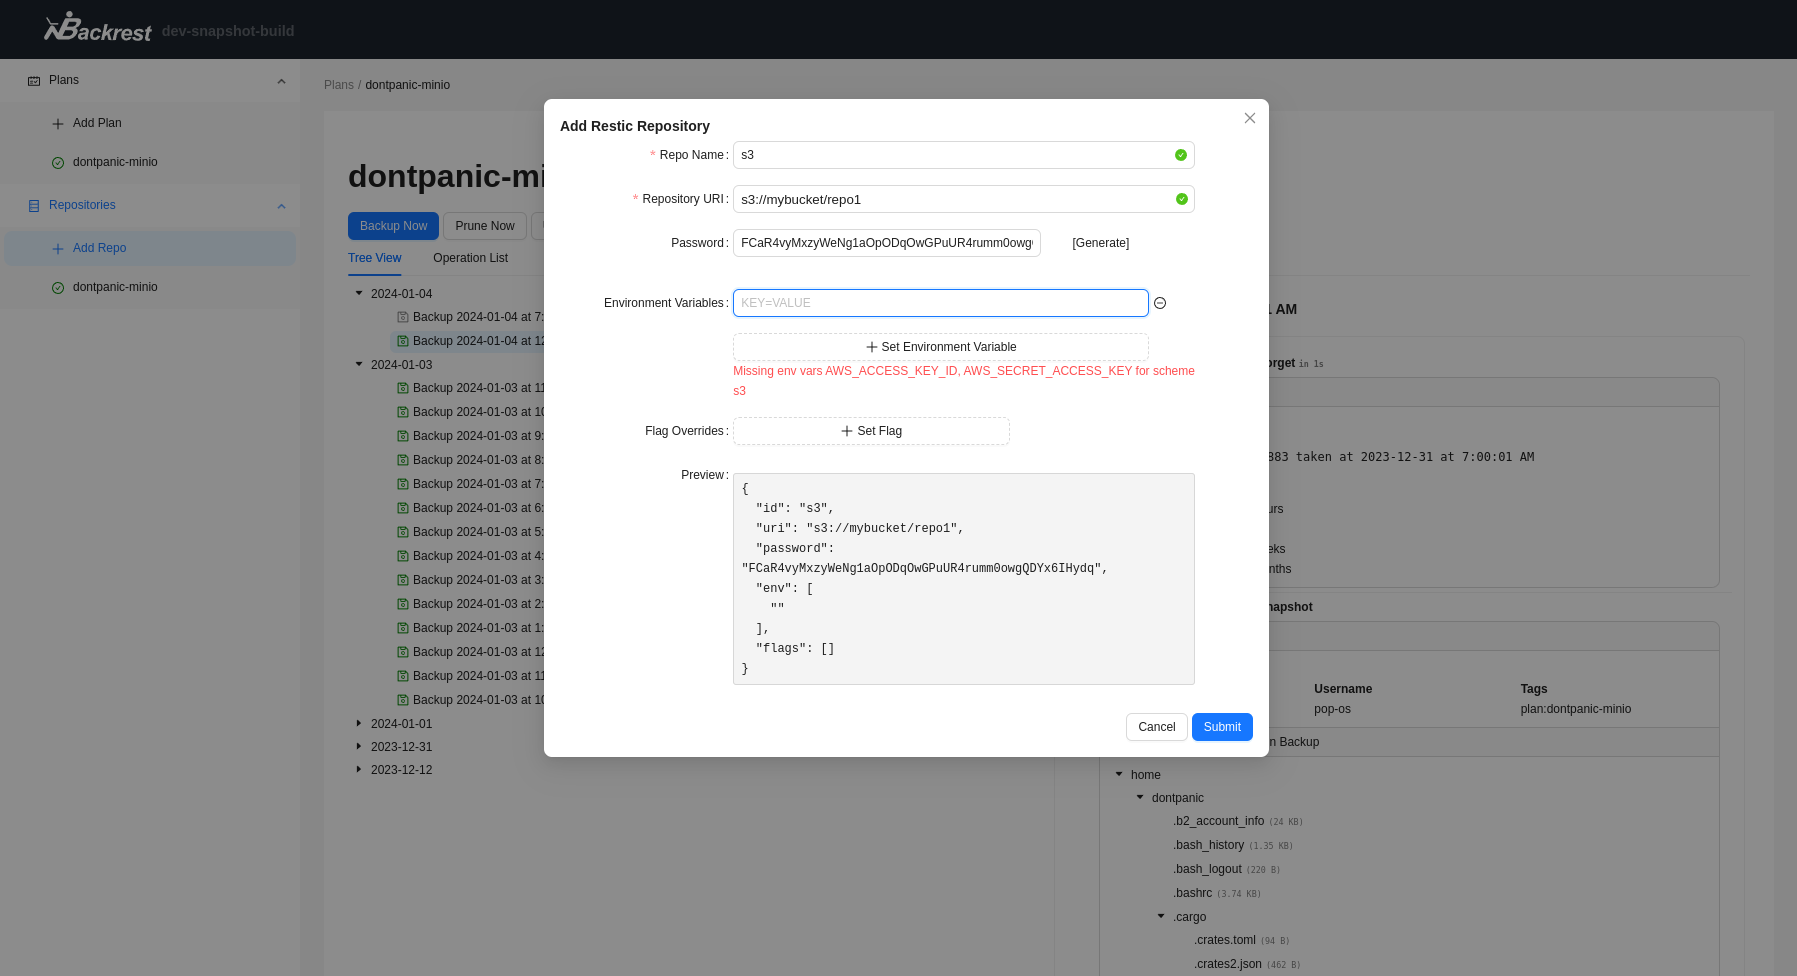
Preview
Operation History & Snapshot Browser
Repo Creation Wizard
Getting Started
Backrest is packaged as a single executable. It can be run directly on Linux, MacOS, and Windows with no dependencies. restic will be downloaded and installed in the data directory on first run.
Download options
- Download and run a release from the releases page.
- Build from source (see below).
- Run with docker:
garethgeorge/backrest:latest(see on dockerhub)
Backrest is accessible from a web browser. By default it binds to 0.0.0.0:9898 and can be accessed at http://localhost:9898. Change the port with the BACKREST_PORT environment variable e.g. BACKREST_PORT=127.0.0.1 backrest to listen only on local interfaces.
Note: backrest installs a specific restic version to ensure that the version of restic matches the version backrest is tested against. This provides the best guarantees for stability. If you wish to use a different version of restic OR if you would prefer to install restic manually you may do so by setting the BACKREST_RESTIC_COMMAND environment variable to the path of the restic binary you wish to use.
Running with Docker Compose
Docker image: https://hub.docker.com/garethgeorge/backrest
Example compose file:
version: "3.2"
services:
  backrest:
    image: garethgeorge/backrest
    container_name: backrest
    volumes:
      - ./backrest/data:/data
      - ./backrest/config:/config
      - ./backrest/cache:/cache
      - /MY-BACKUP-DATA:/userdata # mount your directories to backup somewhere in the filesystem
      - /MY-REPOS:/repos # (optional) mount your restic repositories somewhere in the filesystem.
    environment:
      - BACKREST_DATA=/data # path for backrest data. restic binary and the database are placed here.
      - BACKREST_CONFIG=/config/config.json # path for the backrest config file.
      - XDG_CACHE_HOME=/cache # path for the restic cache which greatly improves performance.
    restart: unless-stopped
    ports:
      - 9898:9898
Running on Linux
Download a release from the releases page
Using systemd with the install script (Recommended)
Extract the release you downloaded and run the install script:
# extract the release to a subfolder of the current directory
mkdir backrest && tar -xzvf backrest_Linux_x86_64.tar.gz -C backrest
# run the install script
cd backrest && ./install.sh
The install script will:
- Move the backrest binary to
/usr/local/bin - Create a systemd service file at
/etc/systemd/system/backrest.service - Enable and start the service
Read the script before running it to make sure you are comfortable with these operations.
Run on startup with cron (Basic)
Move the backrest binary to /usr/local/bin:
sudo mv backrest /usr/local/bin/backrest
Add the following line to your crontab (e.g. crontab -e):
@reboot /usr/local/bin/backrest
Run on startup with systemd manually
sudo mv backrest /usr/local/bin/backrest
Create a systemd service file at /etc/systemd/system/backrest.service with the following contents:
[Unit]
Description=ResticWeb
After=network.target

[Service]
Type=simple
User=<your linux user>
Group=<your linux group>
ExecStart=/usr/local/bin/backrest

[Install]
WantedBy=multi-user.target
Then run the following commands to enable and start the service:
sudo systemctl enable backrest
sudo systemctl start backrest
Note: you can set the linux user and group to your primary user (e.g. whoami when logged in).
Running on MacOS
Download a Darwin release from the releases page and install it to /usr/local/bin.
Using launchd with the install script (Recommended)
Extract the release you downloaded and run the install script:
# extract the release to a subfolder of the current directory
mkdir backrest && tar -xzvf backrest_Darwin_arm64.tar.gz -C backrest
# run the install script
cd backrest && ./install.sh
The install script will:
- Move the backrest binary to
/usr/local/bin - Create a launch agent file at
~/Library/LaunchAgents/com.backrest.plist - Load the launch agent
Read the script before running it to make sure you are comfortable with these operations.
Manually
If setting up backrest manually it's recommended to install the binary to /usr/local/bin and run it manually. You can also create a launch agent to run it on startup or may run it manually when needed.
Running on Windows
Download a Windows release from the releases page and install it to C:\Program Files\Backrest\backrest.exe (create the path if it does not exist).
To run the binary on login, create a shortcut to the binary and place it in the shell:startup folder. See this windows support article for more details.
warning: If you get filesystem errors you may need to run Backrest as administrator for full filesystem access.
warning: Backrest is not tested on Windows to the same bar as Linux and MacOS. Some features may not work as expected.
Configuration
Environment Variables
BACKREST_PORT- the port to bind to. Defaults to 9898.BACKREST_CONFIG- the path to the config file. Defaults to$HOME/.config/backrest/config.jsonor if$XDG_CONFIG_HOMEis set,$XDG_CONFIG_HOME/backrest/config.json.BACKREST_DATA- the path to the data directory. Defaults to$HOME/.local/share/backrestor if$XDG_DATA_HOMEis set,$XDG_DATA_HOME/backrest.BACKREST_RESTIC_COMMAND- the path to the restic binary. Defaults managed version of restic which will be downloaded and installed in the data directory.XDG_CACHE_HOME-- the path to the cache directory. This is propagated to restic.
User Guide
Adding a Repository
A backrest repository maps to the concept of a restic repository (and is indeed a restic repo under-the-hood). A repository is a location where backrest will store your backups.
To add a repository, click the "Add Repository" button on the side nav. You will be prompted to enter a name for the repository and a path to the repository. The path can be a local path or a remote path (e.g. an S3 bucket). See the restic docs for more details on the types of repositories that restic supports. Backrest allows you to configure environment variables which should be used to pass additional credentials for remote repositories. For example, if you are using an S3 bucket, you can configure the AWS_ACCESS_KEY_ID and AWS_SECRET_ACCESS_KEY environment variables to pass your AWS credentials to restic.
Adding a Plan
A plan is a new concept introduced by backrest. A plan is a set of rules for backing up data. A plan can be configured to backup one or more directories to a single repository. Each plan has it's own schedule and retention policy controlling when backups are run and how long backups are kept.
To add a plan, click the "Add Plan" button on the side nav. You will be prompted to enter a name for the plan and select a repository to backup to. You will then be prompted to select one or more directories to backup. A default retention policy is given but you can also pick between time based retention or keeping a configurable number of snapshots.
Running a Backup
Backups are run automatically based on the scheduled specified in your plan. You may additionally click the "Backup Now" button on the plan page to run a backup immediately. You can additionally trigger an immediate "Prune Now" or "Unlock Now" operation from the plan page, these operations are also run automatically in the course of a backup cycle but can be run manually if needed.
Best Practices
- Configure a reasonable retention policy for each plan. Backrest performs well up to a history of ~1000s of snapshots but too many may eventually slow performance.
- Backup your configuration (e.g.
$BACKREST_CONFIGor$HOME/.config/backrest/config.jsonby default on Linux/MacOS)- Your configuration contains the encryption keys for your repositories. If you loose this file you will not be able to restore your backups.
- You may alternatively backup your encryption keys individually in which case you will be able to use restic directly to restore your backups.
 Documentation
Documentation

There is no documentation for this package.